AWS EC2 - Elastic Compute Cloud
Amazon EC2 is a web service that provides resizable computing capacity, from anywhere on the web all around the globe.
Let’s talk about how to create an EC2 instance (or simple words, a server in AWS Cloud):
Step 3: Click the "Launch Instance" button. If you click on the "down arrow" next to the button you will see two options, i) Launch Instance and ii) Launch Instance from template
Step 4: Let's select Launch Instance and we will see a window with 7 steps to Launching an EC2 instance. Step number 1 is "Choose AMI", AMI is Amazon Machine Image.
We have multiple options for AMI's - My AMI, AWS Marketplace and community AMI. Additionally, you can apply the "Free tier only" filter. I would recommend using this filter while learning.
We will choose - Amazon Linux AMI 2018.03.0 (HVM), SSD Volume Type
Step 5: The second window is "Choose an Instance Type". We will select "t2.micro" and click "Next: Configuration Instance Details".
Step 6: The third window is "Configuration Instance Details". We will leave the defaults at this step and click ''Next: Add Storage".
If you want to discuss or know about any of the properties, please feel free to comment or reach out to me.
Step 7: The fourth window "Add Storage" gives us options to - use the Default volume (Shown in the picture below as Root) or Add new volume. For any volume you can select a few options i) Size ii) Volume Type iii) Delete on Termination (checkbox) and iv) Encryption. Click "Next: Add Tags".
Step 8: The fifth window "Add Tags" gives us the options to add tags that can be used and are used to identify an EC2 instance/server. Let's add a few tags, click on "Add Tag" and follow along.
I have added one Tag with key 'Number' and Value '1'. You can have your own requirement for tags example key 'Department' and Value 'Finance'.
Step 9: The sixth window is "Configure Security Group". Let's leave everything as is and move to the last step.
Note: In practice, we need to establish security. I have not configured it here for simplicity and we will talk about it in detail in a separate post.
Step 10: The seventh and the last window is "Review". Here we can review all the 6 options we went through and change if something needs to be changed.
Click "Launch" and select "Create a new key pair" and hit "Download key pair" (This will create a new private security key which we will use to connect to EC2 going forward).
Once you download the file, change the option to "choose an existing key pair" and select "LearnEC2Bascis" (key name can be anything you want). Then click "Launch Instance".
Step 10: It takes some time to launch the instance, you will see a message like below. Click on the "View Instance" button on the bottom of the page to view the instance.
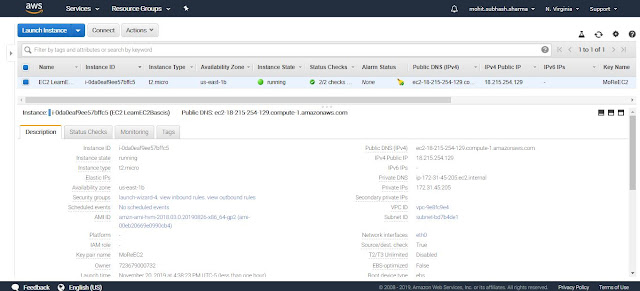
Once the instance is up and running it should look as below. The bottom half of the window shows EC2 instance details tab such as Description, Status Checks, Monitoring, and Tags.
Now your EC2 instance is launched and ready to use, we will discuss how to connect and work with EC2 in upcoming posts.
We have multiple options for AMI's - My AMI, AWS Marketplace and community AMI. Additionally, you can apply the "Free tier only" filter. I would recommend using this filter while learning.
We will choose - Amazon Linux AMI 2018.03.0 (HVM), SSD Volume Type
If you want to discuss or know about any of the properties, please feel free to comment or reach out to me.
Step 7: The fourth window "Add Storage" gives us options to - use the Default volume (Shown in the picture below as Root) or Add new volume. For any volume you can select a few options i) Size ii) Volume Type iii) Delete on Termination (checkbox) and iv) Encryption. Click "Next: Add Tags".
Step 8: The fifth window "Add Tags" gives us the options to add tags that can be used and are used to identify an EC2 instance/server. Let's add a few tags, click on "Add Tag" and follow along.
I have added one Tag with key 'Number' and Value '1'. You can have your own requirement for tags example key 'Department' and Value 'Finance'.
Step 9: The sixth window is "Configure Security Group". Let's leave everything as is and move to the last step.
Step 10: The seventh and the last window is "Review". Here we can review all the 6 options we went through and change if something needs to be changed.
Click "Launch" and select "Create a new key pair" and hit "Download key pair" (This will create a new private security key which we will use to connect to EC2 going forward).
Once you download the file, change the option to "choose an existing key pair" and select "LearnEC2Bascis" (key name can be anything you want). Then click "Launch Instance".
Once the instance is up and running it should look as below. The bottom half of the window shows EC2 instance details tab such as Description, Status Checks, Monitoring, and Tags.


Comments
Post a Comment